BEST Homemade Honey Whole Wheat and Oatmeal Bread

My older daughter has been  begging me ever since I made the Pear/Apple Butter if I will make my Homemade Oatmeal Bread to go with it.  This recipe is one of my favorites.  It is moist and textured.  Just the smell of this cooking in my oven makes my mouth water.  You will NOT be disappointed!


best homemade bread - oatmeal wheat

I will write out the recipe and give you pictures at the end. 

Homemade Oatmeal Bread
by Gina Hardy

2 Tbsp dry yeast
1/2c warm water
Sprinkle of sugar
1/2c honey
1 cube butter  (½ cup)
4 tsp salt
1/2c brown sugar
4 c oats (either kind)
2 c boiling water
2 c cold water
3 c whole wheat flour
6 c white flour

  In a separate bowl, put yeast, warm water, and a sprinkle of sugar; set aside.  In mixing bowl, place honey, butter, salt brown sugar. oats, and boiling water.  Mix until butter is melted.  Add cold water.  Add whole wheat flour and yeast now.  Let mix for 10 min in mixer.  Add white flour gradually, approximately 6 cups to clean sides of mixer.  Flour surface of counter and give it a few good kneads.  It will make about 3 large loafs.  Grease pans, put dough into pans and let raise for 1 1/2 hours.  Bake at 400 for just 5 minutes.  Turn down oven to 350 and bake another 25 minutes.


Wait for yeast solution to get all bubbly, that's when you know it is ready.


I am thankful for my kitchen aid but I think I got the smaller version!  The flour is always flying out of the bowl by the 6th scoop of flour! (pictures is "as is", no clean up before the shot!)  I use the regular mixing paddle - not the dough hook.


Hire helpers to help with the kneading.   (-:  Actually, you only need to turn and knead a few times, just to get a smooth ball for putting in the pan. 


best homemade oatmeal wheat bread rising in baking stone

Cover and let rise!  (anywhere between 1-2 hours, you can check and decide yourself how much you want it to rise.)


TA DA!  Slather butter and your pear jam on a slice for the perfect fall treat!  (OK, anytime treat!)


 Don't miss out on Selina's home decor tips and inspirations - Sign up to receive her once a week post :-)

Enter your email address:


Delivered by FeedBurner


American Clay on Furniture and Winning American Clay Competition

A few of you have asked to have more details about the clay lamp and up close pictures of the winning American Clay wall.  I am happy to oblige. 


With the lamp, it came to me with the center being a white PVC plastic tube.  I have no idea why it was like that or what was on there before.  The rest of the lamp is a very nice, heavy duty structure with a stone base and top. 

I painted the plastic with a coat of the sanded primer then I troweled on the American Clay.  In general American Clay colors are not very deep or dark.  The best way to deepen the color is to apply an oil, stucco soap, or sealer over the top.  I decided to actually add paint over the top of the clay.  By doing this it does take away all the breathablity of the clay and turns it from a very natural product back into just another painted product.  But I decided it was just a small lamp and I was willing to change the clay property this one time. 

I also wanted to add some more depth to this lamp and applied a few leaf stencils over the entire pole.  Just put the stencil on (I sectioned off the leaf from the surrounding stencil) - and pull it off.  Let it all dry before applying any other topping (like the paint).


Sealing the clay with a penetrating sealer is always a good idea for projects like this.  It just gives it some hardening aspects.  (I would do this very last!)


Now on to the winning American Clay wall. (The Details)


american clay on furniture


My client wanted an Old World look.  I started with the American Clay color Acacia in Loma as the base and followed up with a skip trowel technique with more Loma in Acacia.  Once dry I took watered pigment in Tuscon gold, Savannah moss, and a mixture of Savannah moss and palomino valley to create the effect of aged clay - in essence it's like a true fresco - earth pigments on top of the clay as a decorative effect.  I worked it with a stippler brush and burnished it until it was just like she wanted it.  


LOMA in ACACIA BASE with mud glue (primer on edges only)
LOMA in ACACIA TOP COAT skip troweled
Earth Pigments in Savannah Moss, Palomino Valley, and Tuscon Gold. Brushed on watered down.

acacia american clay old world wall


Can you see using this clay wall as a photography backdrop? - no more bulky canvases!

acacia american clay wall

The clay is so pretty that the client has even used it as a backdrop for her children's photos.  Another professional photographer just contacted me and would like me to do a rich terra cotta clay wall aged in a deep tea stain for a backdrop.   They were just so tired of having to pull out the canvases in their home studio.  Now they can have a timeless wall (that will add to their house value) without all the hassle and clutter of canvases.


 Don't miss out on Selina's home decor tips and inspirations - Sign up to receive her once a week post :-)

Enter your email address:


Delivered by FeedBurner


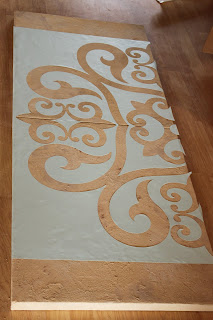
Swirl Clay Art Using Medello Design Stencil and American Clay

Hi Friends!

This is one of my FAVORITE pieces I have made using American Clay as wall art.  

American Clay with Medello Design Swirl


As my love for American Clay continues I try to explore different uses for the product.  I've even gone so far as to coat a lamp out if it. (the center on that lamp used to be a white PVC pipe which is probably why I got it for 10 bucks at a thrift store!)


Today I would like to showcase an art piece I created with the clay and in good 'ol blog fashion try to explain how to........ Do It Yourself.  :-)

First buy yourself a blank art canvas. I bought four canvases 24"x30" which would make the final piece a whoppin 4'x5'!  Michaels craft store carries a lot of sizes. (I've even done this technique on a tiny 8"x11" canvas)


Since American Clay needs something to stick onto I applied a sanded primer to the canvas and allowed it to dry.


Next I covered the entire four canvases with a layer of clay. I would highly recommend doing 2 layers of clay but as you read through my blog you will see I am quite impatient, not a great quality of mine! I compressed the clay extra to make sure it was a solid surface for my stencil.  The canvas needs to be 100% dry before you move onto the next step. (It was starting to dry in this picture.)


Then I applied my stencil.  These very large stencils can be found at Modello Designs - a fabulous design store full of amazing ideas. The stencils they offer come like a sticker you peel off and only use once.  For those extra crafty people try making your own stencil out of a thin plastic sheet.

Medello design on clay


Next I slather on my alternating color of reddish clay over the stencil, carefully troweling in the direction of the design.  I only did one layer of clay (debated doing two. but you know my impatience thing) and slowly peeled off the stencil (while it was still damp - that wasn't because of impatience, it was because working with it damp seemed easier.) When you peel off the stencil pull it completely flat against working area - do not pull UP! 


Medello design using American clay


I'm a sucker for the "old world" look so I felt it necessary to "age" my art.  I watered up some earth pigments and used my round stippler brush to age the clay.


custom clay art piece terra cotta swirls


All finished!  - just how I wanted it.  Next I will be finding the perfect place for this on a wall.  (Can you imagine it above a jetted bathtub on a terra cotta colored clay wall - maybe this is of things to come??)

UPDATE:  I ended up putting this in my NEW HOME :-)

tuscan clay art piece for home decor


If you would like to commission me to do a custom clay art piece for your home please CONTACT ME.  I do understand that the whole DIY thing isn't for everyone and I would be happy to do what I do best for you!

EASY Apple Butter in Crockpot -The smell of fall

Today I have been making one of my favorite EASY recipes (actually I should tell you right now that I will never post a hard recipe - it's just not me.)  I also ADORE using my crock pot, she never let's me down, ever.  (OK unless the ceramic bowl breaks because I chopped in the crock pot too hard, but that's another story)

CROCK POT APPLE BUTTER

Here are the simple instructions:

Slice up apples or pears  
(using mis-shaped, fallen pears or apples from your own tree is perfect!)


back yard pears for pear butter


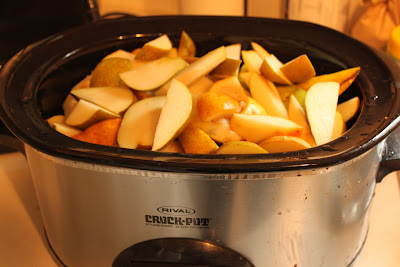
Fill up crock pot to the brim


pear butter in the crockpot


Add 1/2 cup vinegar (any kind but I like the added health benefits of apple cider vinegar)

recipe for pear butter in crockpot


Cook on HIGH for 8 hours (start 1 pm?)

Next lower heat to LOW for another 10 hours (9pm-7am?)

After a total of 18 hours cooking add:

 1/2 c. white sugar and 1/2 c. brown sugar

EXCEPT I try to lower the sugar in my recipes!!!! SOOOOOO

Instead (and optional) of the above I used 1/2 cup Agave Nectar and Stevia to taste (about 1 tsp of the NuStevia brand)

3 tsp cinnamon and a pinch of cloves (or you could just use pumpkin pie spice)

Mix in and cook again on LOW for 4 more hours. (7am - 11am?)


Easy Crockpot Apple or Pear Butter as gifts

Put the Pear Butter in jars and seal. That is all that huge crock pot made - 5 small jars - BUT IT TASTES SO GOOD!!!! 

This goes PERFECT with my Oatmeal Honey Homemade Wheat Bread.  (ya, it's the best bread recipe you'll ever make!)

Enjoy the rest of your week my friends!!


 Don't miss out on Selina's home decor tips and inspirations - Sign up to receive her once a week post :-)

Enter your email address:


Delivered by FeedBurner


American Clay Contest Winner!

My love of American Clay came as I was flipping through a design magazine and ran across this picture of American Clay. 


I was sold instantly.  I wanted my whole life to look like that picture!  OK well at least some rooms in my home.  I showed a friend and she said, “Well let's go to Albuquerque and learn how to do it!”  Easy enough – right?  So off we went and I’ve never looked back.  If your walls were bread, American Clay is the butter, maybe even the butter and the jam.  What I’m saying is American Clay is a MUST! 

I just entered my first Professional American Clay makeover contest and am happy to announce my room won the grand prize. 

Here is a summary:

I entered three of the homes I did this past year one being Heather L from Mom4Life, Kira M from Life in my corner of the world, and my wonderful client Jan L.


Below are the BEFORE and AFTER pictures.


Ledeboer's had me do their  kitchen and dining room     


Loma 2 coat skip troweled in Savannah Moss, aged edges.


McKee's had me do a wall in their Living Room:


Loma 2 coats skip troweled in Acacia.  Aged with multiple earth pigments.


Jan had me do her guest room with an antler fresco:


Porcelina in Nantucket/Acacia mix.  Fresco with the earth pigments.

Actually Jan had me do her entire 5000 sq foot home in American Clay.  It was stunning!!

The winner was chosen by a group of well known professionals in the community. The McKee's living room wall was the winner and the antler's received an honorable mention as 3rd place.   I was awarded $1,000 towards American Clay product.  Since we are building a house soon I will enter one of my rooms for next year's contest.  You can be sure that as many walls as I can afford will have American Clay on them.  I can't wait! 


You can always learn more about American Clay by visiting their website.  My creative mind doesn’t usually get all technical – it will just tell you how pretty something looks.  (Although the informational/technical side of this stuff is quite amazing too –natural, environmentally friendly, non-toxic, no VOC’s and made in the USA....the list goes on and on.)


Thanks my friends!


Related Posts Plugin for WordPress, Blogger...