How to Decorate with Birch Logs - Add Rustic Decor.

Sometimes I'll admit, it's just the little things that excite me. :-)

I asked a landscape friend of mine to collect some birch logs the next time they go trimming trees .  A few months later he showed up with a truck FULL of them!  WOWZERS, I was only hoping for a few logs but hey, that was GREAT!  I probably should have taken them all but I just grabbed about 20 logs and told him I was set. 


You see, I ADORE texture and I ADORE barked trees.  Honestly is there anything more beautiful than rippling crumbling bark full of white, tan and black?  OK, no need to answer that question ;-) I guess I just have this strange passion towards logs - ha!


I was looking and found this log online.....


 It was from SAVE ON CRAFTS where ONE log is on SALE for 17.99 (reg. 27.99)  I am going to text my friend right now and tell him I'll take the truck load - SERIOUSLY!!!!  I mean how much do they charge on top of that to ship the darn log??? 

I am in the wrong business folks, I should be selling birch logs!
I also can't believe how sidetracked I am getting with this post - sorry.

Here are a few pictures of what I did with my birch logs for my decor.


I picked up that iron log holder for 2 bucks at....you guessed it, the thrift store.


My fireplace isn't even real, it's gas.....but I just like to trick people that it's real - hee,hee.

I also put a few log settings on my front porch. 


Can you see why I love them so much???

They are just full of amazing character that only God can give them.


As far as CRAFTS related to birch logs goes - well there are a TON, to many for me to add to this post so I promise I'll do a birch log craft post soon.

So whose thinking, "Who do I know that can get me some BIRCH logs!!"??


Outdoor Christmas Lights - Tips and Tricks for Taking Pictures


Hello All!

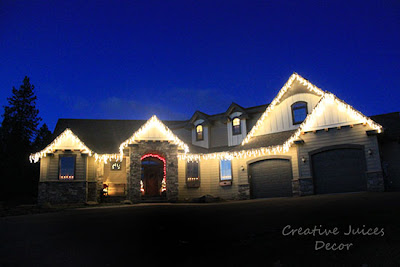
This is the VERY FIRST year in my entire marriage that we have put up Christmas lights!

Granted, there have been some pretty good reasons why we haven't done it before BUT I am just excited we put the extra effort in and got them up this year.  


To be honest, it was more expensive than I thought it would be (bummer!) I suppose if we were on top of it, we would have figured out what we needed (how many strands) last year and bought them on a big clearance for this year. :-)  I guess I can't be on top of everything!


We went with the icicle lights due to the fact that they were a decent price at Costco and they came in 10 foot increments  We needed the smaller strand size to make the endings correct.  (Too much extra line looks odd and definitely not having enough to fill out your roof line looks odd!)

The little candle lights in the window was something I picked up last year at the 75% off.  They are LED lights that turn on for 5 hours and turn off for 19.  I LOVE them!  I put them in all the main level windows.

The best part of all - the kids have been SOOOO excited that we finally have a "Christmas House" ;-)  


I thought I would end this fun Christmas Light post with a few tips and tricks I learned about shooting Chrismtas lights. (No flash needed)


EASY TIPS and TRICKS for taking great outdoor Christmas light shots.


  • FIRST off - do not wait for it to be completely dark when you start to shoot.  
There is a "sweet spot" time when you can get the lights to sparkle but you can still see the sky.  Start shooting right as it STARTS getting dark.


Here was my first shot, middle and my last shot.....(about 5 minutes apart each)

getting dark - the picture is pretty but the lights don't "sparkle" (3.5 FS, ISO 3200, 1/40 SS)


The picture above was around the perfect time for my taste.

Dark enough for lights to sparkle but I still got the blue sky and tree! (3.5 FS, 3200 ISO, 1/10 SS)

  • Compose your picture to get as much sky as possible.  If you have a pretty afterglow from the evening sun try to capture that in the background too.  (the sun was sadly setting the other direction in this photo....you can see it in the windows though!)

  • Also in your composition try to add a tree or something to anchor (and frame) the picture.  We don't have any trees planted yet so this was a hard one for me!

  • You will want a steady hand because even taking a photo at your highest ISO it will be a 15 - 30 second opening at twilight.  Use both hands and try to brace against something solid.  Of course if you have a tripod handy use that! (I just steadied my hand and put it on a two second timer so that when I pushed the button, it waited 2 seconds before it actually took the shot - MUCH steadier for me!)

  • Lastly, play around with the white balance.  If they are older lights (not LED) set your white balance on Tungsten, it will give it a nice glow.


There you have it!  

I am FAR from a professional photographer but it's always nice to hear easy tips that ALL of us can achieve. :-) 


Giveaway for Fun Family Christmas Advent Book

 OK friends, so my wonderful mother (who helped with this before and after project) actually wrote this book!  I told her I’d be delighted to review it and she said she’d be happy to give one of my readers a free copy!


A fun filled Christmas Advent Book

It’s titled “Fun Family Christmas Devotions”  Subtitle “Advent Guide for Busy Parents”  ummmm yep, that’s me!  As I am sure it’s most people, young and old…..

It has some very fun Christmas craft ideas (hey, my craftiness has to come from someone – right?) Sheep sugar cookies, and a faux gingerbread nativity (in which my daughter told me was SO MUCH FUN) are just a few. 


It even comes with a classical music Christmas CD.  (dare I tell you that I am on that CD playing violin and singing??)

Advent Book Givaway
This picture of my son cracks me up! 

A lot of the book talks about the true meaning of Christmas and that the word “Advent” actually means the coming or arrival (of the birth of the Christ-child) With the book she shows you how to easily set up an advent centerpiece and join the tradition of the church through the ages.  Of course along the way you also build family traditions and nurture faith in your children (or grandchildren’s) heart!

clip_image002

You can find out more information on her website http://www.familypearls.org/. Price is 19.95 + 3.00 SH (includes the CD with the book)

*Please make sure you are a following of mine (any way you want!)*

Leave me a comment with your email to enter the giveaway!

If you know a friend that would enjoy this book send them this post!
(ends Wednesday 28th)

Enjoy the reason for this season!

Sweet comments from last year....
I love that your mom has incorporated so much into this book, I feel as those so many family traditions are fleeing from families today, and that this book could help rekindle it. thanks for your amazing blog it is so fun to read and have a great fun filled season ahead :)

Winner was comment #5 Jeannie!  Thanks to all who entered :-)


Our First RUSTIC Christmas Mantel - Twigs, Berries and Reindeer

Here we go!!!   Let's get right into the Rustic Christmas decorating!


Alright, I'll admit, I'm not always ready to start decorating for Christmas but this year is my FIRST year (after a FIVE year renting era) in our new house.


You have to understand, in the rental, we didn't even HAVE a mantel.  I was very thankful for that house but c'mon people, I am an interior designer and I went 5 years without a mantel.  :-)


So I guess I'm a little excited.......bear with me :-)

I wasn't sure what my plan was for my huge mantle but I was walking around Michaels with my eldest daughter and we walked by this GIANT (I mean H.U.G.E) wood wreath and I started laughing and said to my daughter, "Look at that wreath, who in their right mind would buy a huge thing like that??"  We got a kick out of it, chuckling over the idea of the crazy person who would want that.

But of course, as things usually progress......that night when most people's minds SHUT OFF, mine starts to spin and it hit me I AM the weirdo that would by a giant wooden twig wreath!

We went back the next day, and I grabbed that 3' round wreath.......my daughter just looked at me and said, "Weren't we cracking up yesterday thinking that the person who would buy that would was crazy?"  I responded, "YEP, and it will be PERFECT on our mantel" :-)

'Wood twig wreath
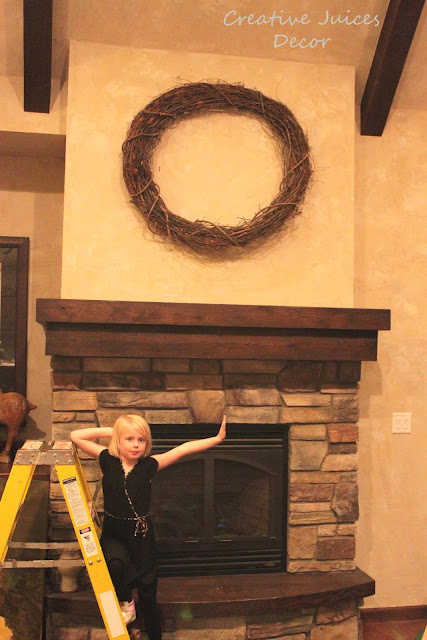
I told my youngest to "pose" so people could compare her to the BIG wreath!  It is 3 1/2 feet wide!!!!


You want to know how much that wooden wreath was?  $12.00 (with my 40% off coupon)  Can you believe that? (insert happy dance!)  I am just giddy that something so large that can make such a big statement was only 12 bucks!  YEA!  All the other trimmings (beads string and lights) were things I already had on hand.


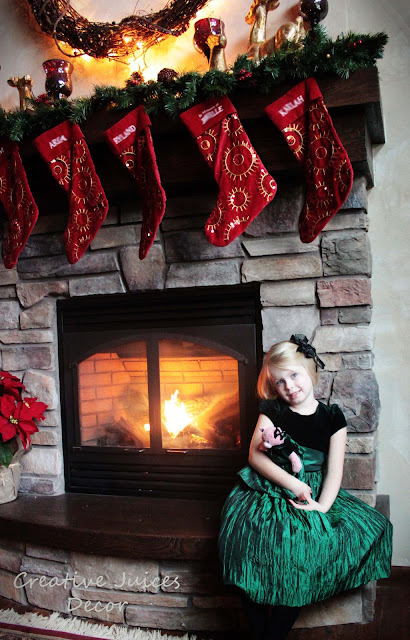
Those reindeer I bought at the thrift store for .50 cents each :-)  And all the greenery was purchased last year on a 75% off clearance sale!  All of those Beautiful Red Candles came from a friend and they have a great story if you want to click on over later.


The candle story has something to do with the little munchkin below :-)


Tuscan Fireplace with red stockings and twig wreath


AND last but not least, I have to show it to you with the lights off :-)  My eldest daughter said her favorite thing to do before she goes to bed is sit in the living room with all the lights off "at least for 30 seconds"


I actually took these pictures before we got our Christmas tree......you see, getting a tree is my husband's job and he's not as gong ho about this whole decorating right away stuff :-)  It's OK though, he's stuck with me!  SOOOO in a post or two, I'll show you the tree.  Someday, I'd love to collect a million birds like the one below and have a Christmas tree decorated in birds and berries.  When my ship comes in, I'll do that but for right now, decorating my mantel for 12.00 is good enough for me!

                                 Come check out the rest of my Christmas Home Tour!


Tips on taking outdoor light photos

Christmas Vignettes!

Front Porch

HAPPY HOLIDAYS!


The Best Way to Dress Your Turkey

Happy Thanksgiving Friends!


Just the other day, I noticed my 5 year old's turkey masterpiece was attached with STICKERS onto my fringe.  Upon closer look this is what I saw........

High heels, hat, skimpy tanktop, mini skirt and a hand full of accessories!


I would DEFINITELY say, this is the BEST way to dress your turkey....


(Some of you who know my gourmet cooking skill may have been worried about the title of this post!  ha!  I have not a clue how to truly dress a turkey!) 


Thanks to this cute little TURKEY, I got a laugh.
(I can totally hear her now, "I'm not a turkey, I'm a little GIRL")


Can you tell she LOVES to dress up!


I am thankful for all of you, my sweet readers :-)  Enjoy your day and a have a great Thanksgiving!
creativejuicesdecor


How to Paint/Hide Electrical Outlets and Plates

Hello my friends!

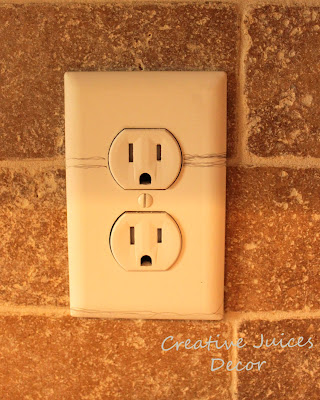
I just finished painting all my electrical outlets because I kept looking in my kitchen and thought, wow, having all those white outlets on my stone back splash really makes things look busy,  I need to CAMOUFLAGE them.

I am SOOOOO happy I did!  The kitchen really looks uncluttered now, it was just a fun custom final touch.


So let me give you a full tutorial on how to camouflage your own outlets.


1.) First take the outlets off the wall.

2.) Sand down the outlets just to roughen them up a bit to take off that super shiny top coat.

3.) You can now prime the outlets with a white (or grey if you are going dark) primer.  You can purchase spray primer at any home improvement store or off the internet.  I'll be honest with you guys, I didn't prime my outlets because I'm bad.  I think they will be fine, but to be on the safe side, I wanted to tell you what you SHOULD do.  

4.) Place the outlets back on the wall with your hand and mark in any grout lines with a pencil (that is, if you have grout lines)


5.) Next coat the entire plate with an acrylic craft paint that matches the base of your tile.  You want the undertone to match exactly, so really be sure and find a color that does that.


6.) If you have a textured tile, start dabbing on other colors with a brush and play around with the shades until you have matched the look of your tile.  If you have a smooth tile, be sure and use a larger brush and do smooth stokes and not a lot of them.


I tell everyone, painting over things it's just like painting your nails, it takes some time and patience to do it correctly but just think of the perfect manicure and you'll be on your way to perfect painting!

Take a look at what I mean.......

begin with buffing

base coating

painting

don't let the layers get to thick

dry between coats

putting on the top clear coat that seals in the color

maybe multiple top coats which once again include drying between coats and not getting it too thick!

Seriously, it's just nails ladies....and if you are a man reading this ignore that entire paragraph!

7.) After your outlet has thoroughly dried, you can apply a matte varnish if your tile is matte (not shiny) or a glossy varnish if the tile (or granite) is shiny.  You can purchase this in a spray can or a regular paint can.  This is where I would recommend putting on a few (2-3) coats and drying between the coats.  You can also buy a polycrylic (it's similar to  varnish) sealer and spray that over the paint too....whatever you want.

Take your time folks......I'm horrible at taking time but I know it's best to do it right so don't rush the painting steps above.  (think nails.....ha!)

8.) Screw back on the outlets, touch up the center screw with a dab of paint to match.


NOTE: From all my research, they recommend  NOT PAINTING the actual plug in.  If any paint gets into those holes, it can make it very difficult to plug things in it, but not only that, it can be a fire hazard!


That's it!!  Let's see some Before and After Photos.


It looks so much cleaner and not all busy.  Worth the time it took :-)


The outlets on the Granite.....


Here is a Final Photo of the Kitchen. (from here you can't see any outlets!)


Do you think you'll do it to some of your outlets?
Has anyone done this already to their own home and have some more tips?  Leave me a comment!


Please see my disclosure policy if you have any questions regarding links.


All About Foyers and Entries! Focal Points and Eye Candy

Sarah over at Thrifty Decor Chick is doing a fun link up party so I thought it was a great opportunity to show all the details of my "foyer" - I suppose it's more of an entry, but my guess is you guys are fine with it being called a foyer for the purposes above!


WELCOME! 

(make sure your entry comes complete with your own cute little barefooted scurry maid - ha!)


Remember when I did a post about 10 easy home decor tips?   Number 9 was about how important first impressions are!  (i.e. the entry!!)  With some simple furniture arrangements and deciding on a focal point anyone can turn their entry into something special.


My favorite part of the room is the iron grilles.  I had a wonderful iron worker create them up for me.  He was good, inexpensive and fast!  My goal was to have one wall in my entry be the focal point. As I stated in the previous post, it is really good to give your eye a focal point, something to set your eyes on when you walk into a home.


I have to laugh at how much I even enjoy the SHADOW it leaves in the entry wall at night :-)


If you are wondering what is on the other side of the iron window it's my dining room :-)


Another substantial part of my entry is the ceiling.  Using natural rough sawn wood beams along with the clay walls and iron accents really lend itself to a Tuscan, Old World design style.


Let's take a look at some other entries/foyers around blog land.  

My motto is, "Why invent the wheel"  

If you see something you love, add it to YOUR room.  I didn't come up with the idea to put an iron "window" in my new home.  I saw it in a magazine and said, "I MUST have that somewhere in my new house!"

Don't be bashful in copying an idea that someone else came up with....I mean who knows, they may have just been copying it from someone else too! :-)


I love how this entry not only has stairs off to the left but also has a welcoming focal point using the teal sofa and the console table.  Notice they also bring nature inside with a pile of birch logs and a green topiary. You can make your own topiary ball and stand like the one below following the highlighted link.  OH and that brick flooring is so rustic and tactile!


This is such a warm entry - they chose such a creamy antique yellow paint for the walls!  Once again they draw your eye in with a console table and some lovely large flowers.


I am absolutely in love with the way Mmm Crafts put up this whimsical plate display.  She didn't even have a large entry and yet she was sure to give your eye a decadent focal point!  If anyone would like to know a way to make a FREE plate hanger be sure and stop by my recent post about that!


Of course, I could go on and on......isn't this is what blogging is all about??  Lots of eye candy and learning new tricks? :-)


Till the next inspiration hits!


Related Posts Plugin for WordPress, Blogger...