ROCK candy - a scientific kids favorite.

Not sure you have to have a scientific kid to love these - just a kid who loves sugar.  (as in ALL children!)

My daughter's oreo turkey sandwich.....sigh  


Rock candy is very fun and pretty but I have to warn you this project may take a day or two to fully crystallize.  Actually I should have titled this ROCK candy - A Character Builder.  :-)

Nevertheless this the THIRD time my kids have requested to make these so I guess the wait wasn't a detriment.  Doing this during a school break is a great time to do it so the kids can look at the progress throughout the day.


Ingredients:

2 c water
4 c sugar (some people have found better luck using more sugar - up to 6 cups)
1 tsp flavoring extract or oil
Food coloring
Glass jar
Skewers or lollipop sticks


Preparation:

1.) Prepare your materials: wash glass jar with hot water to clean it.  I used a shish ka bob skewer and broke it in half - but you can always order real lollipop sticks online.

2.) Wet your wooden skewer and roll it in granulated sugar. this base layer will give the sugar crystals something to "grab" when they start forming. Attach the skewers with tape to a pencil to lay across the top of the jar.  Set the skewers attached to the pencil aside to let dry while you  prepare your sugar syrup.

3.) Place the water in a medium sized pan and bring to a boil.  Begin adding the sugar,  one cup at a time, stirring after each addition. You will notice that it takes longer for the sugar to dissolve after each addition.  Continue to stir and boil the syrup till all the sugar has been added and it is all dissolved.  (this will take around 10 - 15 min)  Remove pan from the heat.

4.) Add the color drops and flavorings. 

5.) Allow the sugar syrup to cool for approximately 10 min, then pour into the prepared jar.  Lower the sugar skewer until it hangs about 1" from the bottom, not too close to each other or the sides of the jar.  (mine are a little short in the picture)

6.) Carefully place your jar in a cool place, away from harsh lights, where it can sit undisturbed.  Cover the top loosely with plastic wrap  or a paper towel.

7.) You should see sugar crystals start forming within 4 hours.  If nothing happens you may have to try boiling the syrup again and dissolve another cut of sugar into it, then pour it back into the jar with the skewers. (Or grab a pack of 8" Lollipop sticks from Amazon)

amazon affiliate link


This time around the crystals formed super fast and were quite small.  (I like the big rock like crystals) Touchy little buggers.

Makes TWO candy sticks per jar.

If your Rock Candy experiment takes a turn for the worse I suggest you put the kids to bed and make these instead:

Rock Candy Jello Shooters with Midori Melon Sour

Photo credit bakersroyal.com

Just having some fun :-)  from Creative Juices Decor!!!

PS If you would like to see my other activities for kids to do during school breaks just click the highlighted section :-)


Power of Spray Paint part 2 - Guest Post


Blog land can be so much fun.  I just met a fabulous lady Kelsey from My Kids Eat Kale who seems to have the same spray paint lamp fetish as I do!  I couldn't resist asking her if I could feature her post as a Spray Paint Part 2 series!  Enjoy.


Took some of this

Applied it to this
($2.00 at the Salvation Army)


To get this


To go with this
(a $7 clearance at Target)


Helpful tip: tape up everything (like the entire cord) that you don't want sprayed. 
Isn't that GORGEOUS!!  Awesome job Kelsey!  Now I need the weather to warm up so I can start spray painting again.  :-)

Keep those Creative Juices flowing!


GINGERBREAD playdough!


Just the thought of this makes me happy.  Memories of playing with play dough and the smell of Christmas all wrapped into one! (seriously - the play dough smells so good and spicy!!)


Mix dry ingredients.  

Next mix water and oil together than add to dry ingredients.  Put in sauce pan cook on medium 2-3 minutes. You can add a few drops of red and green food coloring in this if you want it to be an extra dark brown color.

Stir constantly till dough pulls away from sides. 


Today was messy hair day/princess dress up for my daughter!

Take out and knead - sprinkle cinnamon on the table to make it easier and get the right constancy.  

Store in closed container.

        *      Be sure and get your cinnamon cheap - I go to the dollar store.

        *      I split up the piles and added red glitter to one and gold to the other. 

        *     You could skip the cinnamon and replace it with more flour and add peppermint extract to make peppermint play dough! 

        *Put this in a zip lock bag with the top cut off cute christmas bag, tie on a ribbon and make that tag to give as a gift!


Unfortunately non of the above recipes is edible.  I heard you can do 1c peanut butter, 1 c dry powdered milk and 2-3 tbsp of honey for an edible play dough variation!  Why not throw in some cinnamon to that mixture too!


While I wasn't looking (I sware I put the food coloring far away from her) somehow my daughter managed to find the bottles and while I was typing up this post, proceded to pour it all over her play dough. . As mad as I was the crazy blogger sweet side of me came out and I thought well at least this will add some humor to the post! And BTW, it makes it a very DEEP brown with the additional food coloring!

Oh she knew she was in trouble!

A glittery gingerbread angel :-)

EASY as THAT!  Happy Holidays from Creative Juices Decor!


If you think you'll have fun with this craft - check out the Cinnamon Elmer's Glue ornaments I also love making!


The BEST Avocado Black Bean Brownies - Healthy, Sugar and Gluten Free

Looking for a  dense, fudgy, slightly chewy, decadent brownie that will cover the palate of your mouth with a smooth, rich, chocolaty taste that wont put on the pounds?   

THESE ARE THE BROWNIES TO MAKE. :-)


Still not convinced?  Man, you guys are difficult!  Tell me that doesn't look like a ray of heavenly light falling upon that brownie.


Alright, you guys are on your own.  I'll give you the recipe and you can choose to experience this utopia for yourself or not. (-:

Black Bean and Avocado Brownies 
(yes, as an extra they happen to be sugar, and gluten free)

4 oz unsweetened chocolate (like Bakers brand)
1/2 c butter
1/4 c coconut oil
1 c almonds
2 c cooked black beans
1/2 large or 1 small avocado
1 Tbsp vanilla extract
1/4 tsp coarse sea salt
3/4 c agave nectar
1/2 c warm water*
1 Tbsp chia seeds*
1 Tbsp NuStevia powdered stevia*
1/4 c instant espresso or natural coffee alternative.
4 eggs


First off put your chia seeds and stevia in the 1/2 cup of warm water. Stir and let sit for 10 minutes.  The seeds can hold 10x their weight and will thicken up the water.  The benefit of chia seeds are AMAZING and can be found here.   (* If you do not have access to chia seeds and can't make this mixture just skip it and increase your coconut oil with an additional 1/4 c and add an additional 1/2 c agave nectar)

Melt butter/oil in a glass dish with your chocolate.  Microwave in one minute intervals and stir till just melted.
 
Place the beans, almonds, avocado, vanilla extract, and a couple of spoonfuls of the melted chocolate mixture into a food processor. Blend till smooth. Dump in mixer.

(I'm just going to make this easy since that is how I bake.  I am sure some culinary baker is flinching when I tell you I just dump everything into a mixer.)

Next I add the rest of the chocolate, coffee or coffee substitute, chai/stevia mixture, agave, eggs and salt.

Stir till well blended and it's creamy looking.  Pour into a greased 11x9" baking pan.  Bake at 325 F for 35 minutes or till set.

COOL COMPLETELY before cutting or better yet but these in the refrigerator.  They taste best after they sit for a while and cut so much nicer.  If you want a warm brownie I suggest just microwaving your individual piece.

ENJOY!!!


Guess what else - kids love them.  I'd say that sums it all up right there! (I have picky kids)  At least when you eat five of them you won't feel guilty because your just eating your beans and vegetables. (-:


If you have any questions or comments PLEASE leave one.  I am happy to help in any way.  A lot of the ingredients I list can be purchased at your health food section in a regular grocery store or on line.  My favorite online store is iherb.  They have the best prices and free ground shipping with a $40.00 order.  Plus enter code ESE794 for $5.00 off your order.  (I'm very thrifty so believe me I'm giving you the best on line site I know!)


SPECIAL thanks to the crafty site Jen @ Tater Tots and Jello and the cooking site Amy @ Simply Sugar and Gluten Free for featuring this!  Please check them out they both have wonderful sites!

 Don't miss out on Selina's home decor tips and inspirations - Sign up to receive her once a week post :-)

Enter your email address:


Delivered by FeedBurner


Cinnamon Elmers Glue Ornaments

EASY glue cinnamon and applesauce ornament keepsakes!

cinnamon glue ornament recipe


I believe I have a re-occurring theme on my blog….easy, simple and fast. At least when it comes to recipes/crafts.

cinnamon glue ornament snowflake


This is one of my all time favorites. The smell of cinnamon and spices just add so much to the holiday spirit. 

First, get ready for your house to smell deliciously like Christmas. 

Second, turn on the Christmas music.

Ok now you are ready (-:


cinnamon glue applesauce recipe


Ingredients:  (not for eating!)

     *  1 1/2 cups (8oz) ground cinnamon (can add dash of nutmeg/cloves –whatever you want!)
     *  1 cup applesauce (store bought works best)
     *  1/3 cup white school glue (Elmer's or other brand)

Simply mix these 3 ingredients together.  (my kids went crazy with wanting to "mix" it with their hands!) After it's mixed plop it down onto wax paper (or the counter) and use extra cinnamon to "flour" working area especially if dough is a little sticky. Lightly knead the dough.

Roll out to 1/4" (this picture is too thin, mine should have been thicker) and use Christmas cookie cutters for your shapes.


Use a straw for poking a hole on the top.

Let them dry for about 4 days turning them over at least once a day.  If you want to speed up the process you can bake for an hour at 200 F and let air dry 24 hours after that.  I did one batch in the oven and the other on a cooling rack.  The air drying on a cooling rack turned out looking more "professional" but if this is just a fun craft for kids who cares.   Actually I just let mine cool after the hour of baking and the kids painted on them right away.  What kid can wait 4 days to finish a project!

cinnamon glue ornament How to


Once dry feel free to paint them using puffy paint or glitter paint.  Or make it really easy on yourself and just personalize it with a Sharpie pen! (they have cool silver sharpies that would really look nice!)


Dove Cinnamon Ornament Recipe

Amazon affiliate link

Be sure and check out your local dollar store for cheap cinnamon, OR grab some bulk at Costco or Amazon. 


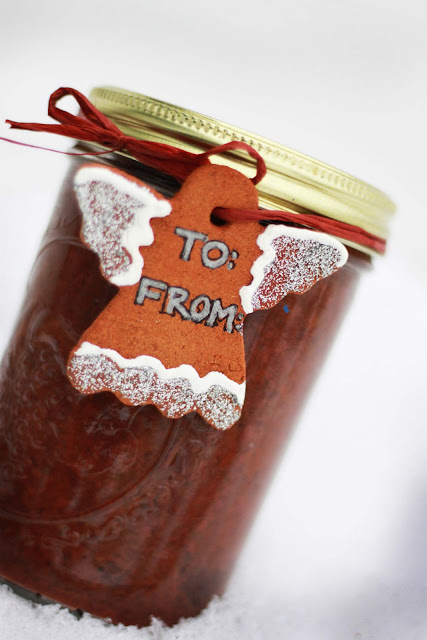
cinnamon ornament gift tag idea
Gift tag added to my Apple/Pear butter

They make such great gifts to teachers,friends, relatives because the kids made them.  C'mon, nothing melts a grandparents heart like something hand made by their precious grandchildren!

Made by my daughter for grandma.


Here are a few more ideas using your ornaments:

1.) Use them on top of your presents as a gift tag, just write with a sharpie To: and From:
2.) String them through yarn and put them around the lid of your homemade gift can goods. 
3.) I have heard of people decorating a small tree using only these ornaments and when a guest leaves you give them one to take.
4.) Make a complete garland out of them.


angel ornament with cinnamon glue gift tag
Gift tag added to Apple Cider candle
Remember…


It doesn’t have to be Christmas for you to make these. How about hearts for Valentines Day, or flowers for Mother's Day.

Once again - I hope I got your Creative Juices flowing! 

Feel free to check out my post on Craft Ideas for School Break!  Lots of fun :-)


Don't miss out on Selina's home decor tips and inspirations - Sign up to receive her once a week post :-)

Enter your email address:


Delivered by FeedBurner


ICE candle holder - free and GORGEOUS!

I guess living in a freezing cold area of the country has it's benefits.  Things like these ICE CANDLES  stay frozen! 


On Thanksgiving my aunt had these stacked along the entry to her house.

The glowing, sparkly wet candles looked so amazing.  She used large gallon containers but said you could even make giant ones out of a 5 gallon buckets (wouldn't that look amazing!) 

My daughter and I started with a set of little ones. 


We wanted to make them all different heights so we just filled up the cups to different levels. 

Next we put them outside to freeze.  It took our water glasses overnight to get to the correct freezing point.  You don't want them 100%  frozen  - just about 75% solid.  Tip upside down and run some warm water around the cup or bucket and out comes your amazing ice candle holder and the extra water which makes up the space for your candle! 


Place them on your porch steps or on the railing of your deck.  It will make such a statement. 


Make your entry a winter wonderland!


If you have any questions just leave a comment and I'll be sure and answer them.  Can you imagine red holly berries (or even cranberries) layered in the bottom of a gallon size one?  Any other ideas?  Is anyone going to try this?  We'd love to hear!

Be sure and check out my TOP 5 Christmas post to see other fun ideas for this Holiday Season!


I'd love to have you come follow along!

Linking to Remodelaholic


Related Posts Plugin for WordPress, Blogger...